


Integration of FLUX Fill Redux ACE Workflow for Universal Migration: Added Seam Issue Fix Module
Principle:
1. Based on the previous FLUX FILL REDUX universal migration process, the ACE model has been added, significantly improving the migration effect;
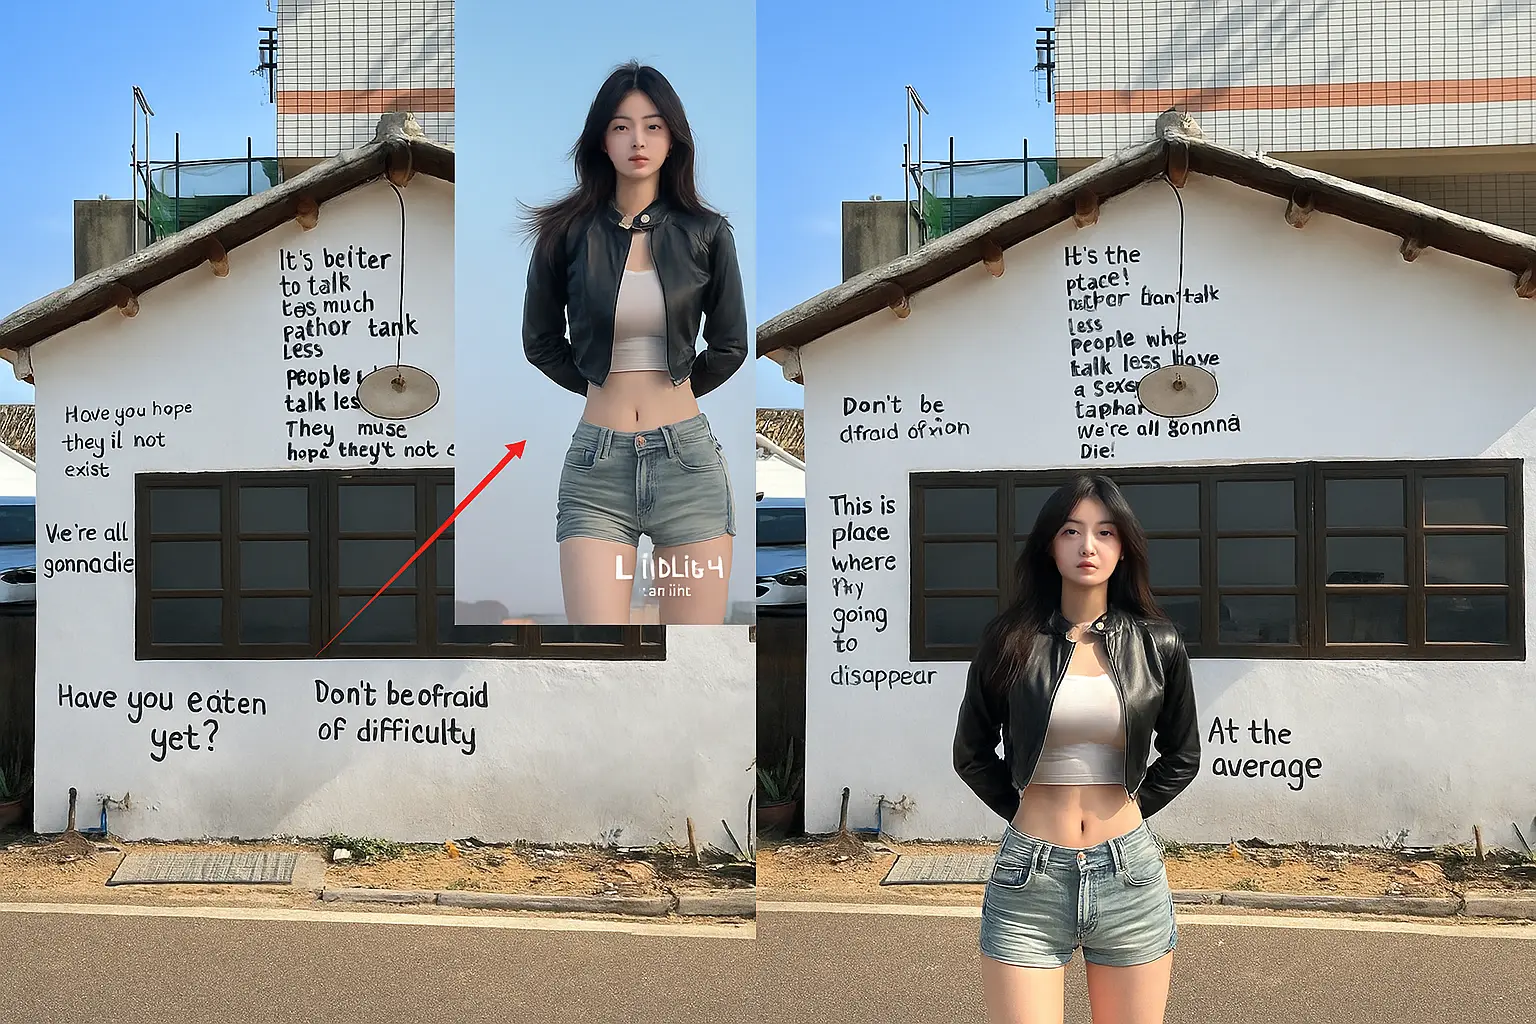
2. Using the CropAndStitch cutting node, the masked area of the reference image is cropped and enlarged, allowing Redux and the ACE model to have stronger reference power (higher weight) for the details of the reference image, making migration easier.
Similarly, the masked area of the main image is cropped and enlarged to avoid the connection image being too large and sampling slowly, while ensuring sufficient pixels for redrawing (for example, if you are given a small sticky note to draw a beautiful woman versus an A4 sheet to draw a beautiful woman, which one is easier to draw well?). This approach achieves excellent detail, restoration, realism, and proportion, while also being highly efficient and making better use of GPU resources. (This is the core of the entire workflow.)
3. The final redrawn image is stitched back to the main image through the stitch node. You can also use the LayerStyle Mask Clipping V2 by Huluwabro to clip and restore, but I personally prefer using CropAndStitch, as it automatically enlarges, reduces, and stitches after clipping. Additionally, when migrating portrait models to scenes, there are almost no seams, making the result very natural.
4. Previously, text prompts in FILL Redux were ineffective, but with the addition of ACE, the weight of text prompts can be enhanced. You can use the reverse prompt node to generate text prompts based on the image, or manually input your instructions in Chinese to tell it what you want (for example: The person on the left is wearing the clothes of the person on the right? The person on the left is holding the XX object from the right? The person on the right is sitting/standing next to the person on the left... Just try to describe it as much as possible. Here, the main image is on the left, the reference image is on the right, and the redrawing area is also the left side of the connection image).
4. Face swapping, outfit swapping, product swapping, scene model switching, and making two people stand together are all possible. Keep experimenting.
5. When migrating a model to a scene, it is often found that the lighting is automatically adjusted according to the scene, and it looks very realistic.
6. A TTP upscale HD node will be added in the future.
Operation Method:
5. Upload the main image for retouching, right-click the image, select "Open in Mask Editor," and then paint over the parts you want to modify. You can also draw a closed loop to automatically fill the mask. Follow the same steps to paint the area you want to reference in the reference image, then just click start.
6. You can set the number of output images. 1 means 1 image, 2 means 2 images, and 4 means 4 images. The larger the number, the longer the computation time. Generally, 1 image takes about 1 minute. The first run will take longer to load the model. Keep trying until you achieve a satisfactory result (later enhancements will still require multiple attempts).
7. If you have any questions, you can consult VX: FDS LXC
'%3e%3cpath d='M22.941142499999998%2c18.4907265625C20.7973025%2c21.2337465625%2c18.653602499999998%2c23.9764965625%2c16.5096155%2c26.719196562500002C15.7464715%2c27.6958965625%2c16.4596735%2c29.1035265625%2c17.7179125%2c29.1035265625L30.5804125%2c29.1035265625C31.8385125%2c29.1035265625%2c32.5519125%2c27.6958965625%2c31.7883125%2c26.719196562500002C29.6448125%2c23.9764965625%2c27.500812500000002%2c21.2337965625%2c25.3570725%2c18.4907265625C24.7489725%2c17.7127265625%2c23.5494225%2c17.7127265625%2c22.941142499999998%2c18.4907265625ZM24.0441925%2c19.3528665625L24.0440425%2c19.3530465625L19.6246325%2c25.0074065625L17.6126225%2c27.5813865625Q17.5882425%2c27.6125865625%2c17.6045625%2c27.6447765625Q17.6343025%2c27.7034865625%2c17.7179125%2c27.7034865625L30.5804125%2c27.7034865625Q30.663912500000002%2c27.7034865625%2c30.6937125%2c27.6448265625Q30.7099125%2c27.6128265625%2c30.685412499999998%2c27.5814965625L24.254022499999998%2c19.3528565625Q24.2183525%2c19.3072265625%2c24.149182500000002%2c19.3072265625Q24.0800125%2c19.3072265625%2c24.0441925%2c19.3528665625Z' fill-rule='evenodd' fill='%23BEC4CA' fill-opacity='1'/%3e%3c/g%3e%3c/g%3e%3c/svg%3e) 7290
7290'%3e%3cg%3e%3cpath d='M16.45%2c9L16.45%2c15.75Q16.45%2c15.81894%2c16.436500000000002%2c15.88656Q16.423099999999998%2c15.954180000000001%2c16.3967%2c16.017879999999998Q16.3703%2c16.08157%2c16.332%2c16.1389Q16.2937%2c16.19622%2c16.244999999999997%2c16.244979999999998Q16.196199999999997%2c16.29373%2c16.1389%2c16.33203Q16.0816%2c16.37033%2c16.017899999999997%2c16.396720000000002Q15.9542%2c16.423099999999998%2c15.8866%2c16.43655Q15.8189%2c16.45%2c15.75%2c16.45L2.25%2c16.45Q2.181056%2c16.45%2c2.1134370000000002%2c16.43655Q2.045818%2c16.423099999999998%2c1.982122%2c16.39671Q1.918426%2c16.37033%2c1.8611010000000001%2c16.33203Q1.803776%2c16.29373%2c1.755025%2c16.244970000000002Q1.706275%2c16.19622%2c1.667971%2c16.1389Q1.6296680000000001%2c16.08157%2c1.603284%2c16.017879999999998Q1.5769009999999999%2c15.954180000000001%2c1.56345%2c15.88656Q1.55%2c15.81894%2c1.55%2c15.75L1.55%2c9.00311222Q1.55%2c8.9341683%2c1.56345%2c8.866549Q1.5769009999999999%2c8.79893%2c1.603284%2c8.735234Q1.6296680000000001%2c8.671538%2c1.667971%2c8.614213Q1.706275%2c8.556888%2c1.755025%2c8.508138Q1.803776%2c8.459387%2c1.8611010000000001%2c8.421084Q1.918426%2c8.38278%2c1.982122%2c8.356397Q2.045818%2c8.330013%2c2.1134370000000002%2c8.316563Q2.181056%2c8.303112%2c2.25%2c8.303112Q2.318944%2c8.303112%2c2.3865629999999998%2c8.316563Q2.454182%2c8.330013%2c2.517878%2c8.356397Q2.581574%2c8.38278%2c2.638899%2c8.421084Q2.696224%2c8.459387%2c2.744975%2c8.508137Q2.7937250000000002%2c8.556888%2c2.832029%2c8.614213Q2.870332%2c8.671538%2c2.896716%2c8.735234Q2.923099%2c8.79893%2c2.93655%2c8.866549Q2.95%2c8.9341682%2c2.95%2c9.0031122L2.95%2c15.05L15.05%2c15.05L15.05%2c9Q15.05%2c8.931056%2c15.0634%2c8.863437Q15.0769%2c8.795818%2c15.1033%2c8.732122Q15.1297%2c8.668426%2c15.168%2c8.611101Q15.2063%2c8.553776%2c15.255%2c8.505025Q15.3038%2c8.456275%2c15.3611%2c8.417971Q15.4184%2c8.379668%2c15.4821%2c8.353284Q15.5458%2c8.326901%2c15.6134%2c8.31345Q15.6811%2c8.3%2c15.75%2c8.3Q15.8189%2c8.3%2c15.8866%2c8.31345Q15.9542%2c8.326901%2c16.017899999999997%2c8.353284Q16.0816%2c8.379668%2c16.1389%2c8.417971Q16.196199999999997%2c8.456275%2c16.244999999999997%2c8.505025Q16.2937%2c8.553776%2c16.332%2c8.611101Q16.3703%2c8.668426%2c16.3967%2c8.732122Q16.423099999999998%2c8.795818%2c16.436500000000002%2c8.863437Q16.45%2c8.931056%2c16.45%2c9Z' fill-rule='evenodd' fill='%23BEC4CA' fill-opacity='1'/%3e%3c/g%3e%3cg%3e%3cpath d='M6.120042%2c8.13058028125L9%2c11.01053828125L11.87999%2c8.13054428125L11.88003%2c8.13051328125Q11.978480000000001%2c8.03205728125%2c12.10712%2c7.97877228125Q12.235759999999999%2c7.92548828125%2c12.375%2c7.92548828125Q12.44394%2c7.92548828125%2c12.51156%2c7.93893828125Q12.579180000000001%2c7.95238928125%2c12.64288%2c7.97877228125Q12.70657%2c8.00515628125%2c12.7639%2c8.04345928125Q12.82122%2c8.08176328125%2c12.86997%2c8.13051328125Q12.91872%2c8.17926428125%2c12.95703%2c8.23658928125Q12.99533%2c8.29391428125%2c13.021709999999999%2c8.35761028125Q13.0481%2c8.42130628125%2c13.06155%2c8.48892528125Q13.075%2c8.55654428125%2c13.075%2c8.62548828125Q13.075%2c8.76472728125%2c13.02172%2c8.89336628125Q12.96843%2c9.02200628125%2c12.86997%2c9.12046328125L12.86994%2c9.12049328125L9.49497%2c12.49545828125Q9.39652%2c12.59391828125%2c9.26788%2c12.64720828125Q9.139240000000001%2c12.70048828125%2c9%2c12.70048828125Q8.860759999999999%2c12.70048828125%2c8.73212%2c12.64720828125Q8.60348%2c12.59391828125%2c8.50503%2c12.49545828125L5.130025%2c9.12046328125Q5.031569%2c9.02200628125%2c4.978284%2c8.89336628125Q4.925%2c8.76472728125%2c4.925%2c8.62548828125Q4.925%2c8.55654428125%2c4.93845%2c8.48892528125Q4.951901%2c8.42130628125%2c4.978284%2c8.35761028125Q5.004668%2c8.29391428125%2c5.042971%2c8.23658928125Q5.081275%2c8.17926428125%2c5.130025%2c8.13051328125Q5.178776%2c8.08176328125%2c5.236101%2c8.04345928125Q5.293426%2c8.00515628125%2c5.357122%2c7.97877228125Q5.420818%2c7.95238928125%2c5.488437%2c7.93893828125Q5.556056%2c7.92548828125%2c5.625%2c7.92548828125Q5.764239%2c7.92548828125%2c5.892878%2c7.97877228125Q6.021518%2c8.03205728125%2c6.119975%2c8.13051328125L6.120042%2c8.13058028125Z' fill-rule='evenodd' fill='%23BEC4CA' fill-opacity='1'/%3e%3c/g%3e%3cg%3e%3cpath d='M8.29560546875%2c2.25Q8.29560546875%2c2.181056%2c8.30905546875%2c2.1134370000000002Q8.32250646875%2c2.045818%2c8.34888946875%2c1.982122Q8.37527346875%2c1.918426%2c8.41357646875%2c1.8611010000000001Q8.45188046875%2c1.803776%2c8.50063046875%2c1.755025Q8.54938146875%2c1.706275%2c8.60670646875%2c1.667971Q8.66403146875%2c1.6296680000000001%2c8.72772746875%2c1.603284Q8.79142346875%2c1.5769009999999999%2c8.85904246875%2c1.56345Q8.92666146875%2c1.55%2c8.99560546875%2c1.55Q9.06454946875%2c1.55%2c9.13216846875%2c1.56345Q9.19978746875%2c1.5769009999999999%2c9.26348346875%2c1.603284Q9.32717946875%2c1.6296680000000001%2c9.38450446875%2c1.667971Q9.44182946875%2c1.706275%2c9.49058046875%2c1.755025Q9.53933046875%2c1.803776%2c9.57763446875%2c1.8611010000000001Q9.61593746875%2c1.918426%2c9.64232146875%2c1.982122Q9.66870446875%2c2.045818%2c9.68215546875%2c2.1134370000000002Q9.69560546875%2c2.181056%2c9.69560546875%2c2.25L9.69560546875%2c12Q9.69560546875%2c12.06894%2c9.68215546875%2c12.13656Q9.66870446875%2c12.20418%2c9.64232146875%2c12.2679Q9.61593746875%2c12.3316%2c9.57763446875%2c12.3889Q9.53933046875%2c12.4462%2c9.49058046875%2c12.495Q9.44182946875%2c12.5437%2c9.38450446875%2c12.582Q9.32717946875%2c12.6203%2c9.26348346875%2c12.6467Q9.19978746875%2c12.6731%2c9.13216846875%2c12.6865Q9.06454946875%2c12.7%2c8.99560546875%2c12.7Q8.92666146875%2c12.7%2c8.85904246875%2c12.6866Q8.79142346875%2c12.6731%2c8.72772746875%2c12.6467Q8.66403146875%2c12.6203%2c8.60670646875%2c12.582Q8.54938146875%2c12.5437%2c8.50063046875%2c12.495Q8.45188046875%2c12.4462%2c8.41357646875%2c12.3889Q8.37527346875%2c12.3316%2c8.34888946875%2c12.2679Q8.32250646875%2c12.20418%2c8.30905546875%2c12.13656Q8.29560546875%2c12.06894%2c8.29560546875%2c12L8.29560546875%2c2.25Z' fill-rule='evenodd' fill='%23BEC4CA' fill-opacity='1'/%3e%3c/g%3e%3c/g%3e%3c/svg%3e) Download
Download 39
39 228
228'%3e%3cg%3e%3cpath d='M2.00048828125%2c13.15673828125C2.00048828125%2c13.43287828125%2c2.22434628125%2c13.65673828125%2c2.50048828125%2c13.65673828125L3.00048828125%2c13.65673828125L3.00048828125%2c6.15673828125C3.00048828125%2c5.88059628125%2c2.77663028125%2c5.65673828125%2c2.50048828125%2c5.65673828125C2.22434628125%2c5.65673828125%2c2.00048828125%2c5.88059628125%2c2.00048828125%2c6.15673828125L2.00048828125%2c13.15673828125Z' fill='%23D8D8D8' fill-opacity='1'/%3e%3c/g%3e%3cg transform='matrix(0%2c1%2c-1%2c0%2c22.656814575195312%2c2.6558380126953125)'%3e%3cpath d='M10.00048828125%2c13.156326293945312L10.00048828125%2c20.656326293945312L10.50048828125%2c20.656326293945312C10.77663028125%2c20.656326293945312%2c11.00048828125%2c20.43246629394531%2c11.00048828125%2c20.156326293945312L11.00048828125%2c13.156326293945312C11.00048828125%2c12.880184293945312%2c10.77663028125%2c12.656326293945312%2c10.50048828125%2c12.656326293945312C10.22434628125%2c12.656326293945312%2c10.00048828125%2c12.880184293945312%2c10.00048828125%2c13.156326293945312Z' fill='%23D8D8D8' fill-opacity='1'/%3e%3c/g%3e%3c/g%3e%3c/g%3e%3c/svg%3e)
Integration of FLUX Fill Redux ACE Workflow for Universal Migration: Added Seam Issue Fix Module
Principle:
1. Based on the previous FLUX FILL REDUX universal migration process, the ACE model has been added, significantly improving the migration effect;
2. Using the CropAndStitch cutting node, the masked area of the reference image is cropped and enlarged, allowing Redux and the ACE model to have stronger reference power (higher weight) for the details of the reference image, making migration easier.
Similarly, the masked area of the main image is cropped and enlarged to avoid the connection image being too large and sampling slowly, while ensuring sufficient pixels for redrawing (for example, if you are given a small sticky note to draw a beautiful woman versus an A4 sheet to draw a beautiful woman, which one is easier to draw well?). This approach achieves excellent detail, restoration, realism, and proportion, while also being highly efficient and making better use of GPU resources. (This is the core of the entire workflow.)
3. The final redrawn image is stitched back to the main image through the stitch node. You can also use the LayerStyle Mask Clipping V2 by Huluwabro to clip and restore, but I personally prefer using CropAndStitch, as it automatically enlarges, reduces, and stitches after clipping. Additionally, when migrating portrait models to scenes, there are almost no seams, making the result very natural.
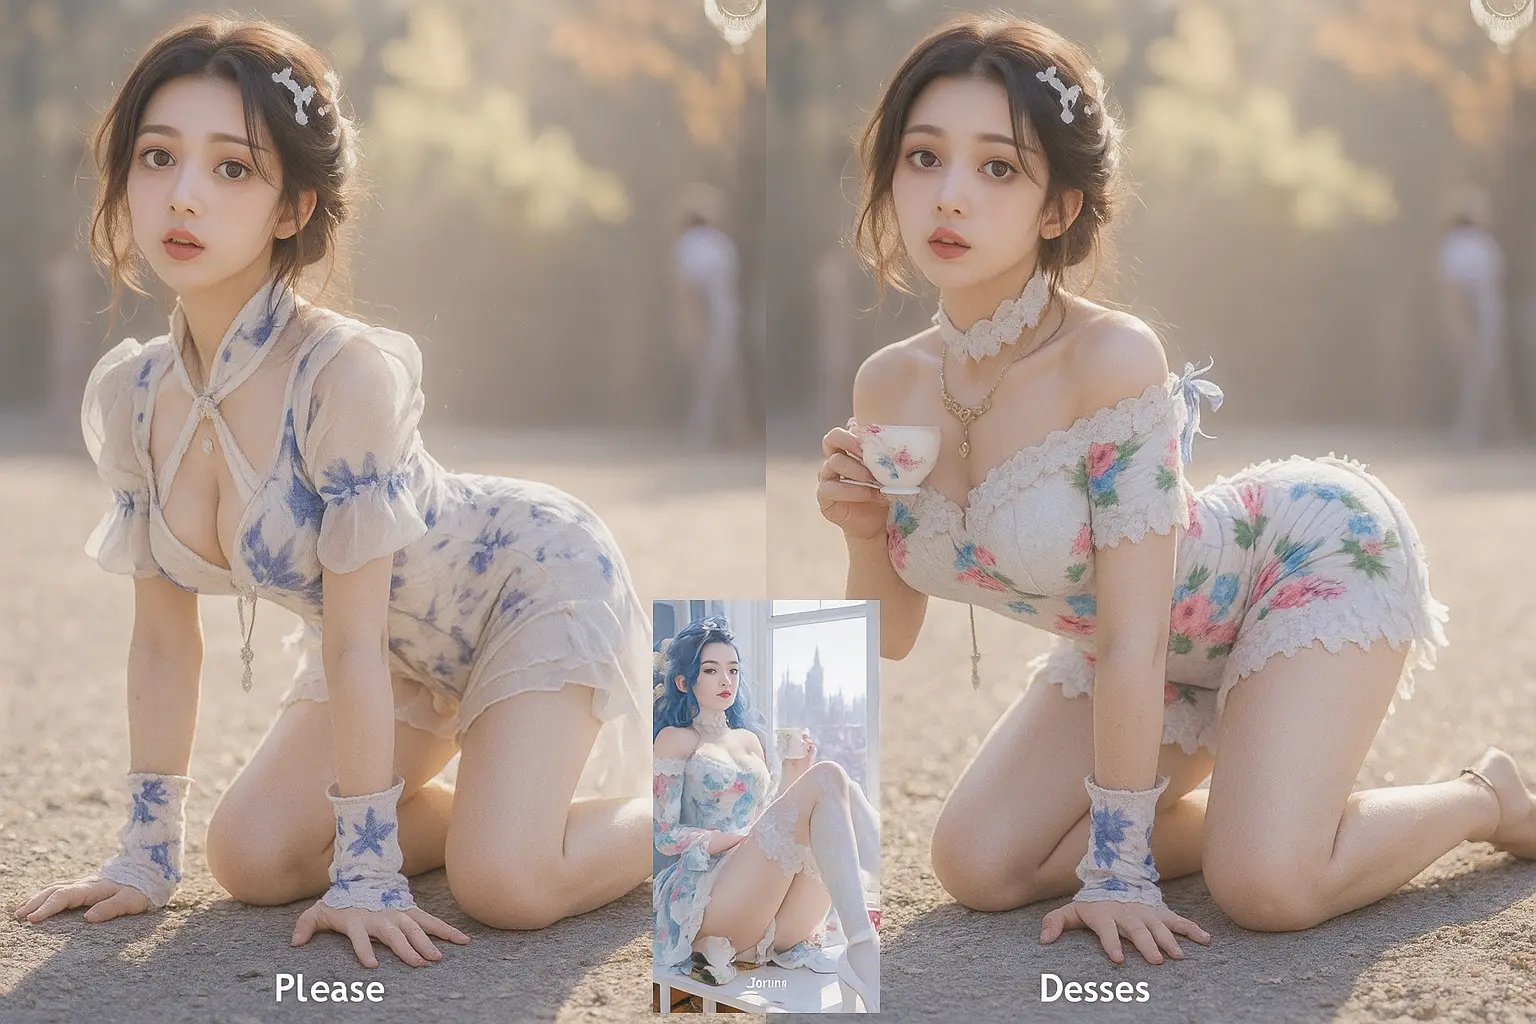
4. Previously, text prompts in FILL Redux were ineffective, but with the addition of ACE, the weight of text prompts can be enhanced. You can use the reverse prompt node to generate text prompts based on the image, or manually input your instructions in Chinese to tell it what you want (for example: The person on the left is wearing the clothes of the person on the right? The person on the left is holding the XX object from the right? The person on the right is sitting/standing next to the person on the left... Just try to describe it as much as possible. Here, the main image is on the left, the reference image is on the right, and the redrawing area is also the left side of the connection image).
4. Face swapping, outfit swapping, product swapping, scene model switching, and making two people stand together are all possible. Keep experimenting.
5. When migrating a model to a scene, it is often found that the lighting is automatically adjusted according to the scene, and it looks very realistic.
6. A TTP upscale HD node will be added in the future.
Operation Method:
5. Upload the main image for retouching, right-click the image, select "Open in Mask Editor," and then paint over the parts you want to modify. You can also draw a closed loop to automatically fill the mask. Follow the same steps to paint the area you want to reference in the reference image, then just click start.
6. You can set the number of output images. 1 means 1 image, 2 means 2 images, and 4 means 4 images. The larger the number, the longer the computation time. Generally, 1 image takes about 1 minute. The first run will take longer to load the model. Keep trying until you achieve a satisfactory result (later enhancements will still require multiple attempts).
7. If you have any questions, you can consult VX: FDS LXC
'%3e%3cg%3e%3cpath d='M9.0100553%2c1.0100494Q8.6%2c1.420102%2c8.6%2c2Q8.6%2c2.57989%2c9.0100543%2c2.9899500000000003Q9.420109%2c3.4%2c10%2c3.4Q10.57989%2c3.4%2c10.98995%2c2.9899500000000003Q11.4%2c2.57989%2c11.4%2c2Q11.4%2c1.420102%2c10.98994%2c1.0100495Q10.57989%2c0.6%2c10%2c0.6Q9.420108%2c0.6%2c9.0100553%2c1.0100494ZM9.57574%2c2.4242600000000003Q9.4%2c2.24852%2c9.4%2c2Q9.4%2c1.751474%2c9.575739%2c1.5757370000000002Q9.751477%2c1.4%2c10%2c1.4Q10.24852%2c1.4%2c10.42426%2c1.5757370000000002Q10.6%2c1.751474%2c10.6%2c2Q10.6%2c2.24852%2c10.42426%2c2.4242600000000003Q10.24852%2c2.6%2c10%2c2.6Q9.751479%2c2.6%2c9.57574%2c2.4242600000000003Z' fill-rule='evenodd' fill='white' fill-opacity='1'/%3e%3c/g%3e%3cg%3e%3cpath d='M5.0100541%2c5.0100541Q4.6%2c5.420108%2c4.6%2c6Q4.6%2c6.57989%2c5.0100541%2c6.98995Q5.420108%2c7.4%2c6%2c7.4Q6.57989%2c7.4%2c6.98995%2c6.98995Q7.4%2c6.57989%2c7.4%2c6Q7.4%2c5.420108%2c6.98995%2c5.0100541Q6.57989%2c4.6%2c6%2c4.6Q5.420108%2c4.6%2c5.0100541%2c5.0100541ZM5.57574%2c6.42426Q5.4%2c6.24852%2c5.4%2c6Q5.4%2c5.751479%2c5.57574%2c5.57574Q5.751479%2c5.4%2c6%2c5.4Q6.24852%2c5.4%2c6.42426%2c5.57574Q6.6%2c5.751479%2c6.6%2c6Q6.6%2c6.24852%2c6.42426%2c6.42426Q6.24852%2c6.6%2c6%2c6.6Q5.751479%2c6.6%2c5.57574%2c6.42426Z' fill-rule='evenodd' fill='white' fill-opacity='1'/%3e%3c/g%3e%3cg%3e%3cpath d='M9.0100541%2c9.0100541Q8.6%2c9.420108%2c8.6%2c10Q8.6%2c10.57989%2c9.0100541%2c10.98995Q9.420108%2c11.4%2c10%2c11.4Q10.57989%2c11.4%2c10.98995%2c10.98995Q11.4%2c10.57989%2c11.4%2c10Q11.4%2c9.420108%2c10.98995%2c9.0100541Q10.57989%2c8.6%2c10%2c8.6Q9.420108%2c8.6%2c9.0100541%2c9.0100541ZM9.57574%2c10.42426Q9.4%2c10.24852%2c9.4%2c10Q9.4%2c9.751479%2c9.57574%2c9.57574Q9.751479%2c9.4%2c10%2c9.4Q10.24852%2c9.4%2c10.42426%2c9.57574Q10.6%2c9.751479%2c10.6%2c10Q10.6%2c10.24852%2c10.42426%2c10.42426Q10.24852%2c10.6%2c10%2c10.6Q9.751479%2c10.6%2c9.57574%2c10.42426Z' fill-rule='evenodd' fill='white' fill-opacity='1'/%3e%3c/g%3e%3cg%3e%3cpath d='M1.0100504%2c1.0100504Q0.6%2c1.420101%2c0.6%2c2Q0.6%2c2.57989%2c1.0100494%2c2.98994Q1.420102%2c3.4%2c2%2c3.4Q2.57989%2c3.4%2c2.9899500000000003%2c2.9899500000000003Q3.4%2c2.57989%2c3.4%2c2Q3.4%2c1.420102%2c2.98994%2c1.0100495Q2.57989%2c0.6%2c2%2c0.6Q1.420101%2c0.6%2c1.0100504%2c1.0100504ZM1.5757370000000002%2c2.4242600000000003Q1.4%2c2.24852%2c1.4%2c2Q1.4%2c1.7514720000000001%2c1.575736%2c1.575736Q1.7514720000000001%2c1.4%2c2%2c1.4Q2.24852%2c1.4%2c2.4242600000000003%2c1.5757370000000002Q2.6%2c1.751474%2c2.6%2c2Q2.6%2c2.24852%2c2.4242600000000003%2c2.4242600000000003Q2.24852%2c2.6%2c2%2c2.6Q1.751474%2c2.6%2c1.5757370000000002%2c2.4242600000000003Z' fill-rule='evenodd' fill='white' fill-opacity='1'/%3e%3c/g%3e%3cg%3e%3cpath d='M1.0100495%2c9.0100553Q0.6%2c9.420108%2c0.6%2c10Q0.6%2c10.57989%2c1.0100494%2c10.98994Q1.420102%2c11.4%2c2%2c11.4Q2.57989%2c11.4%2c2.9899500000000003%2c10.98995Q3.4%2c10.57989%2c3.4%2c10Q3.4%2c9.420109%2c2.9899500000000003%2c9.0100543Q2.57989%2c8.6%2c2%2c8.6Q1.420102%2c8.6%2c1.0100495%2c9.0100553ZM1.5757370000000002%2c10.42426Q1.4%2c10.24852%2c1.4%2c10Q1.4%2c9.751477%2c1.5757370000000002%2c9.575739Q1.751474%2c9.4%2c2%2c9.4Q2.24852%2c9.4%2c2.4242600000000003%2c9.57574Q2.6%2c9.751479%2c2.6%2c10Q2.6%2c10.24852%2c2.4242600000000003%2c10.42426Q2.24852%2c10.6%2c2%2c10.6Q1.751474%2c10.6%2c1.5757370000000002%2c10.42426Z' fill-rule='evenodd' fill='white' fill-opacity='1'/%3e%3c/g%3e%3cg%3e%3cpath d='M5%2c10.4L7%2c10.4Q7.0394000000000005%2c10.4%2c7.07804%2c10.392314Q7.116680000000001%2c10.384628%2c7.15307%2c10.369552Q7.18947%2c10.354475%2c7.22223%2c10.332588Q7.254989999999999%2c10.3107%2c7.28284%2c10.282843Q7.310700000000001%2c10.254985%2c7.33259%2c10.222228Q7.354480000000001%2c10.189471%2c7.36955%2c10.153073Q7.38463%2c10.116676%2c7.39231%2c10.0780361Q7.4%2c10.0393966%2c7.4%2c10Q7.4%2c9.9606034%2c7.39231%2c9.9219639Q7.38463%2c9.883324%2c7.36955%2c9.846927Q7.354480000000001%2c9.810529%2c7.33259%2c9.777772Q7.310700000000001%2c9.745015%2c7.28284%2c9.717157Q7.254989999999999%2c9.6893%2c7.22223%2c9.667412Q7.18947%2c9.645525%2c7.15307%2c9.630448Q7.116680000000001%2c9.615372%2c7.07804%2c9.607686Q7.0394000000000005%2c9.6%2c7%2c9.6L5%2c9.6Q4.9606034%2c9.6%2c4.9219639%2c9.607686Q4.883324%2c9.615372%2c4.846927%2c9.630448Q4.810529%2c9.645525%2c4.777772%2c9.667412Q4.745015%2c9.6893%2c4.717157%2c9.717157Q4.6893%2c9.745015%2c4.667412%2c9.777772Q4.645525%2c9.810529%2c4.630448%2c9.846927Q4.615372%2c9.883324%2c4.607686%2c9.9219639Q4.6%2c9.9606034%2c4.6%2c10Q4.6%2c10.0393966%2c4.607686%2c10.0780361Q4.615372%2c10.116676%2c4.630448%2c10.153073Q4.645525%2c10.189471%2c4.667412%2c10.222228Q4.6893%2c10.254985%2c4.717157%2c10.282843Q4.745015%2c10.3107%2c4.777772%2c10.332588Q4.810529%2c10.354475%2c4.846927%2c10.369552Q4.883324%2c10.384628%2c4.9219639%2c10.392314Q4.9606034%2c10.4%2c5%2c10.4Z' fill-rule='evenodd' fill='white' fill-opacity='1'/%3e%3c/g%3e%3cg%3e%3cpath d='M5%2c2.4L7%2c2.4Q7.0394000000000005%2c2.4%2c7.07804%2c2.392314Q7.116680000000001%2c2.384628%2c7.15307%2c2.369552Q7.18947%2c2.354475%2c7.22223%2c2.332588Q7.254989999999999%2c2.3106999999999998%2c7.28284%2c2.282843Q7.310700000000001%2c2.254985%2c7.33259%2c2.222228Q7.354480000000001%2c2.189471%2c7.36955%2c2.153073Q7.38463%2c2.116676%2c7.39231%2c2.0780361Q7.4%2c2.0393966%2c7.4%2c2Q7.4%2c1.9606034%2c7.39231%2c1.9219639Q7.38463%2c1.883324%2c7.36955%2c1.846927Q7.354480000000001%2c1.810529%2c7.33259%2c1.777772Q7.310700000000001%2c1.745015%2c7.28284%2c1.717157Q7.254989999999999%2c1.6893%2c7.22223%2c1.6674120000000001Q7.18947%2c1.6455250000000001%2c7.15307%2c1.630448Q7.116680000000001%2c1.615372%2c7.07804%2c1.607686Q7.0394000000000005%2c1.6%2c7%2c1.6L5%2c1.6Q4.9606034%2c1.6%2c4.9219639%2c1.607686Q4.883324%2c1.615372%2c4.846927%2c1.630448Q4.810529%2c1.6455250000000001%2c4.777772%2c1.6674120000000001Q4.745015%2c1.6893%2c4.717157%2c1.717157Q4.6893%2c1.745015%2c4.667412%2c1.777772Q4.645525%2c1.810529%2c4.630448%2c1.846927Q4.615372%2c1.883324%2c4.607686%2c1.9219639Q4.6%2c1.9606034%2c4.6%2c2Q4.6%2c2.0393966%2c4.607686%2c2.0780361Q4.615372%2c2.116676%2c4.630448%2c2.153073Q4.645525%2c2.189471%2c4.667412%2c2.222228Q4.6893%2c2.254985%2c4.717157%2c2.282843Q4.745015%2c2.3106999999999998%2c4.777772%2c2.332588Q4.810529%2c2.354475%2c4.846927%2c2.369552Q4.883324%2c2.384628%2c4.9219639%2c2.392314Q4.9606034%2c2.4%2c5%2c2.4Z' fill-rule='evenodd' fill='white' fill-opacity='1'/%3e%3c/g%3e%3cg%3e%3cpath d='M1.6%2c5L1.6%2c7Q1.6%2c7.0394000000000005%2c1.607686%2c7.07804Q1.615372%2c7.116680000000001%2c1.630448%2c7.15307Q1.6455250000000001%2c7.18947%2c1.6674120000000001%2c7.22223Q1.6893%2c7.254989999999999%2c1.717157%2c7.28284Q1.745015%2c7.310700000000001%2c1.777772%2c7.33259Q1.810529%2c7.354480000000001%2c1.846927%2c7.36955Q1.883324%2c7.38463%2c1.9219639%2c7.39231Q1.9606034%2c7.4%2c2%2c7.4Q2.0393966%2c7.4%2c2.0780361%2c7.39231Q2.116676%2c7.38463%2c2.153073%2c7.36955Q2.189471%2c7.354480000000001%2c2.222228%2c7.33259Q2.254985%2c7.310700000000001%2c2.282843%2c7.28284Q2.3106999999999998%2c7.254989999999999%2c2.332588%2c7.22223Q2.354475%2c7.18947%2c2.369552%2c7.15307Q2.384628%2c7.116680000000001%2c2.392314%2c7.07804Q2.4%2c7.0394000000000005%2c2.4%2c7L2.4%2c5Q2.4%2c4.9606034%2c2.392314%2c4.9219639Q2.384628%2c4.883324%2c2.369552%2c4.846927Q2.354475%2c4.810529%2c2.332588%2c4.777772Q2.3106999999999998%2c4.745015%2c2.282843%2c4.717157Q2.254985%2c4.6893%2c2.222228%2c4.667412Q2.189471%2c4.645525%2c2.153073%2c4.630448Q2.116676%2c4.615372%2c2.0780361%2c4.607686Q2.0393966%2c4.6%2c2%2c4.6Q1.9606034%2c4.6%2c1.9219639%2c4.607686Q1.883324%2c4.615372%2c1.846927%2c4.630448Q1.810529%2c4.645525%2c1.777772%2c4.667412Q1.745015%2c4.6893%2c1.717157%2c4.717157Q1.6893%2c4.745015%2c1.6674120000000001%2c4.777772Q1.6455250000000001%2c4.810529%2c1.630448%2c4.846927Q1.615372%2c4.883324%2c1.607686%2c4.9219639Q1.6%2c4.9606034%2c1.6%2c5Z' fill-rule='evenodd' fill='white' fill-opacity='1'/%3e%3c/g%3e%3cg%3e%3cpath d='M9.6%2c5L9.6%2c7Q9.6%2c7.0394000000000005%2c9.607686%2c7.07804Q9.615372%2c7.116680000000001%2c9.630448%2c7.15307Q9.645525%2c7.18947%2c9.667412%2c7.22223Q9.6893%2c7.254989999999999%2c9.717157%2c7.28284Q9.745015%2c7.310700000000001%2c9.777772%2c7.33259Q9.810529%2c7.354480000000001%2c9.846927%2c7.36955Q9.883324%2c7.38463%2c9.9219639%2c7.39231Q9.9606034%2c7.4%2c10%2c7.4Q10.0393966%2c7.4%2c10.0780361%2c7.39231Q10.116676%2c7.38463%2c10.153073%2c7.36955Q10.189471%2c7.354480000000001%2c10.222228%2c7.33259Q10.254985%2c7.310700000000001%2c10.282843%2c7.28284Q10.3107%2c7.254989999999999%2c10.332588%2c7.22223Q10.354475%2c7.18947%2c10.369552%2c7.15307Q10.384628%2c7.116680000000001%2c10.392314%2c7.07804Q10.4%2c7.0394000000000005%2c10.4%2c7L10.4%2c5Q10.4%2c4.9606034%2c10.392314%2c4.9219639Q10.384628%2c4.883324%2c10.369552%2c4.846927Q10.354475%2c4.810529%2c10.332588%2c4.777772Q10.3107%2c4.745015%2c10.282843%2c4.717157Q10.254985%2c4.6893%2c10.222228%2c4.667412Q10.189471%2c4.645525%2c10.153073%2c4.630448Q10.116676%2c4.615372%2c10.0780361%2c4.607686Q10.0393966%2c4.6%2c10%2c4.6Q9.9606034%2c4.6%2c9.9219639%2c4.607686Q9.883324%2c4.615372%2c9.846927%2c4.630448Q9.810529%2c4.645525%2c9.777772%2c4.667412Q9.745015%2c4.6893%2c9.717157%2c4.717157Q9.6893%2c4.745015%2c9.667412%2c4.777772Q9.645525%2c4.810529%2c9.630448%2c4.846927Q9.615372%2c4.883324%2c9.607686%2c4.9219639Q9.6%2c4.9606034%2c9.6%2c5Z' fill-rule='evenodd' fill='white' fill-opacity='1'/%3e%3c/g%3e%3c/g%3e%3c/svg%3e) Primitive Nodes (13) Custom Nodes (35)
Primitive Nodes (13) Custom Nodes (35)